Understanding Spray Foam Removal
What is Spray Foam Removal?
Spray foam removal refers to the process of extracting or eliminating spray foam insulation from walls, ceilings, or other surfaces. This material, often used for its excellent insulating properties, can sometimes pose challenges when it becomes damaged, degraded, or undesirable. The removal process is intricate, involving specific techniques and tools designed to safely and effectively eliminate the foam without harming underlying structures.
Reasons for Spray Foam Removal
There are several reasons why homeowners or contractors might consider spray foam removal. Common motivations include:
- Damage or Degradation: Over time, spray foam can deteriorate, losing its insulating properties, and requiring replacement.
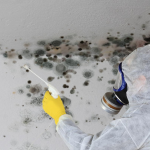
- Mold and Moisture Issues: If foam insulation becomes wet, it can lead to mold growth, necessitating removal to mitigate health risks.
- Home Renovations: Remodeling projects may require the removal of existing foam to make way for new materials or updated insulation solutions.
- Improper Application: Poorly applied foam may leave gaps or cause air leaks, leading to inefficient insulation.
- Pest Problems: Infestations may cause damage to foam insulation, making its removal essential for effective pest control.
Safety Considerations During Removal
Prioritizing safety during spray foam removal is crucial. Protective gear such as gloves, goggles, and masks should be worn to prevent exposure to harmful particles and chemicals. It’s essential to ventilate the area adequately to reduce inhalation risks. Additionally, understanding the chemical properties of the spray foam being removed can help mitigate hazards, particularly if the foam contains isocyanates or other hazardous materials.
Preparation for Spray Foam Removal
Tools and Equipment Needed
Effective spray foam removal requires specific tools and equipment, including:
- Utility Knife: For cutting and scraping away foam.
- Heat Gun: Useful for softening the foam, making it easier to remove.
- Shop Vacuum: Essential for cleaning up debris and residual foam.
- Protective Gear: Gloves, goggles, and masks for safety during the removal process.
- Scrapers and Chisels: For effectively prying away foam from surfaces.
Creating an Effective Work Environment
Setting up a safe and organized workspace is vital for efficient foam removal. Ensure that the area is well-ventilated and free from clutter. Cover nearby surfaces with drop cloths to protect them from debris. Establish clear pathways for movement and ensure that all tools are easily accessible to minimize hazards and maximize efficiency during the removal process.
Evaluating the Area for Removal
Before starting the removal process, it’s essential to evaluate the area thoroughly. Check for any electrical wiring, plumbing, or structural elements that might be affected during the removal. Assess the type of spray foam and its condition to determine the best removal approach. Knowing what you’re dealing with upfront can save time and reduce risks during the actual removal.
Techniques for Successful Spray Foam Removal
Step-by-Step Removal Process
The following step-by-step guide outlines an effective technique for removing spray foam:
Step 1: Preparation
Gather all necessary tools, put on protective gear, and ensure the area is ventilated. Cover surfaces to keep the workspace clean.
Step 2: Cutting the Foam
Use a utility knife to carefully cut into the foam. Start at the edges and work your way in, making clean lines to prevent damage to surfaces underneath.
Step 3: Heating the Foam
If the foam is particularly tough, a heat gun can help by softening it. Apply heat evenly and carefully to avoid burning the underlying materials.
Step 4: Scraping Away the Foam
Once the foam is cut and possibly softened, use scrapers or chisels to lift and remove it. Take your time to ensure you’re not damaging the underlying surface.
Step 5: Cleaning Up
After removing the foam, use a shop vacuum to clean any remaining debris. Ensure the space is clear to prepare for any subsequent work or inspection.
Common Challenges and Solutions
During the spray foam removal process, several challenges may arise. Here are common issues and tips for overcoming them:
- Stubborn Foam: If the foam is resistant to removal, try applying heat to soften it before scraping.
- Surface Damage: Work carefully to avoid gouging underlying materials; use softer tools for delicate surfaces.
- Residual Adhesive: In cases where adhesive remains, solvents specific to the foam type may be needed for full removal.
Best Practices for Efficiency
Maximize efficiency with these best practices:
- Plan Ahead: Identify all areas with foam and create a removal strategy.
- Work Steadily: Take your time to avoid mistakes that could complicate the removal process.
- Utilize Assistance: Have a partner help for safety and efficiency when working in larger areas.
Aftercare and Clean-Up Post Removal
Disposing of Removed Foam Properly
It’s crucial to dispose of removed spray foam correctly. Depending on local regulations, some types of foam can be recycled, while others must go to a landfill. Always check local disposal guidelines to ensure compliance and avoid environmental harm.
Inspecting for Residual Foam
After removal, carefully inspect the area for any leftover foam or debris. Addressing residual foam is crucial as it can lead to complications such as moisture entrapment or pests. Ensuring a completely clean surface will prepare the area for new insulation or repairs.
Preparing the Space for New Insulation
Once the old foam has been successfully removed and the area cleaned, take the time to assess and prepare the space for new insulation. This may include repairing any damage to walls or structures, ensuring a clear path for installation, and considering the type of insulation that will be used next, whether it’s a different foam option or another material altogether.
FAQs about Spray Foam Removal
What is the cost of spray foam removal?
The cost varies based on the area and accessibility, typically ranging from $1 to $3 per square foot.
How long does spray foam removal take?
Depending on the area size, it can take anywhere from a few hours to a couple of days.
Is spray foam removal safe for my home?
Yes, when conducted by professionals following safety protocols, it is safe.
Can I remove spray foam myself?
DIY removal is possible but may pose risks; hiring professionals is often recommended.
What happens if residue is left after removal?
Residual foam can trap moisture and lead to mold growth; thorough clean-up is essential.